Topic Introduction
A flat tire is a mechanical problem with a human timeline: you need to stop safely, protect yourself, and get the wheel back on the road with the right torque and pressure. This walkthrough focuses on the most common passenger-car scenario: a roadside flat where you have a spare tire and a jack, not a full workshop repair.
Start by identifying what you actually have. Many cars carry a temporary spare (often called a “donut”) and a tire inflator kit instead of a full-size spare. If your vehicle has a mobility kit, the steps change, and the jack-and-spare workflow may not apply. If you do have a spare, check the spare’s sidewall for the maximum speed marking and the recommended pressure printed on the tire or in the owner’s manual.
Problems And Pain Points
People often get the order wrong. They loosen lug nuts after lifting the car, which increases the chance of spinning the wheel or stressing the jack. They also forget to set the parking brake firmly, which matters because a jack only lifts; it does not “hold” the car on its own.
Another recurring issue is tool mismatch. Some vehicles use a wheel lock key instead of standard lug nuts, and the key is frequently stored in a glove box or under a panel in the trunk. If you cannot remove the lock, you cannot remove the wheel. A third dependency is the jack type: scissor jacks and bottle jacks behave differently, and the wrong placement can damage the pinch weld or rocker panel.
Tire type also changes the outcome. A temporary spare usually has a smaller tread and a speed limit; driving too fast or too far can overheat the tire. If the flat is on a vehicle with a tire-pressure monitoring system, the warning light may remain on after the swap until the system relearns or the sensors update, which can take time and varies by make and model.
Solutions And Advice
Prepare The Right Setup
Gather tools before you touch the wheel: spare tire, jack, lug wrench, wheel lock key (if present), and a tire pressure gauge. If your car has a wheel chock, place it on the opposite side of the wheel that will be lifted. If you do not have a chock, a small block of wood can help on level ground, though it is not a substitute for proper chocking.
Check the spare’s pressure if you have a gauge. Many temporary spares are shipped inflated to a specific pressure, but real-world pressure drops over time. A practical number: if the spare is marked for 60 psi (common on some temporary spares), do not assume it is still at 60 psi after months in the trunk. If you cannot measure pressure, inflate to the owner’s manual guidance when you reach a station.
Set the parking brake and shift to Park (automatic) or First gear/Reverse (manual). Turn off the engine. Keep passengers away from the work area. If you are on a slope, position the wheel chock so it blocks wheel rotation in the direction the car could roll.
Lift And Remove Safely
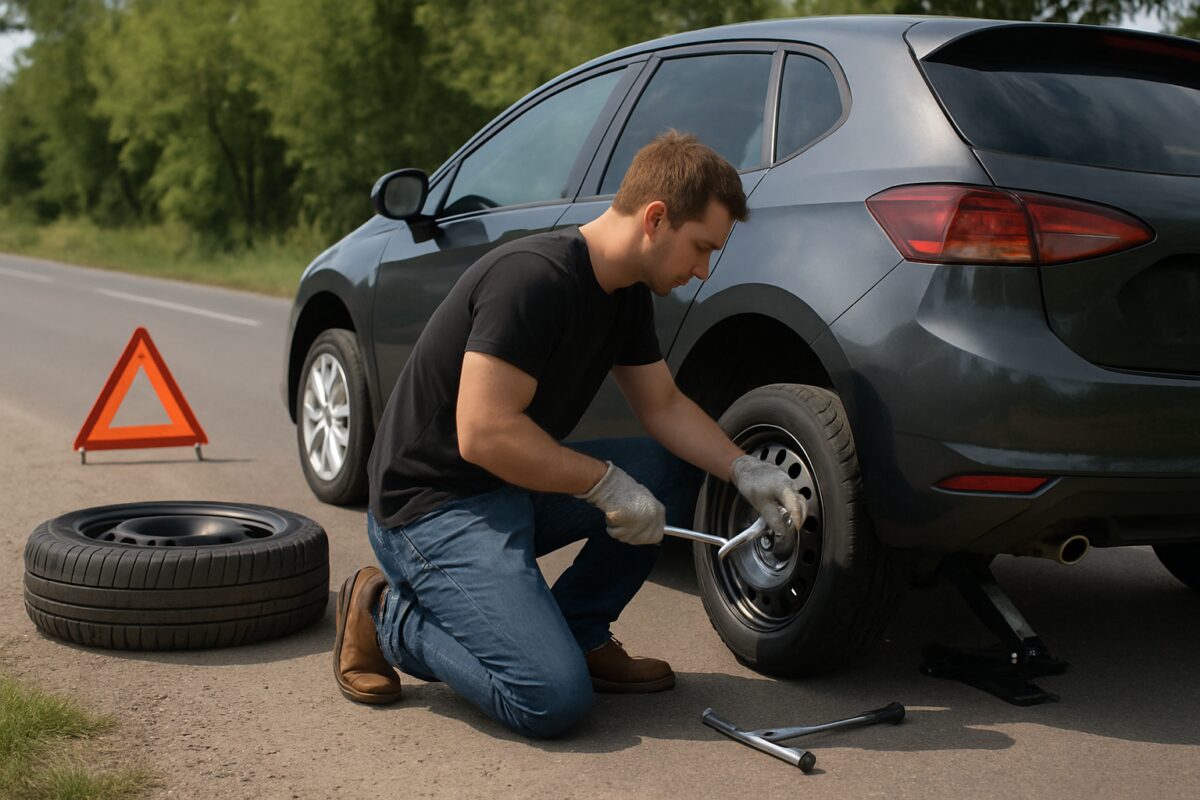
Loosen lug nuts slightly before lifting. Use steady force and stop when the nuts break free; full removal happens after the wheel is off the ground. If the lug nuts resist, step on the wrench handle carefully rather than yanking at an angle that can slip. A mild frustration point: some lug wrenches are short, and the leverage feels inadequate until you reposition your stance.
Place the jack at the correct jack point. Look for reinforced markings near the pinch weld or the frame rail. Raise the car until the flat tire clears the ground by a few centimeters. Do not crawl under the car. Keep your hands and feet away from the space between the tire and the body.
Remove lug nuts and set them where they will not roll away. A simple method is to place them in a clean container or on the wheel cover area. Pull the wheel straight off the hub. If the wheel sticks, a firm kick to the sidewall can help, but avoid striking the brake components.
Mount The Spare And Tighten
Mount the spare with the wheel face aligned to the hub. Hand-thread lug nuts to prevent cross-threading. Tighten them in a star pattern so the wheel seats evenly. If you have a torque wrench, use it after the wheel is on the ground; if you only have the lug wrench, tighten firmly but do not guess wildly.
Torque matters because it affects wheel retention and brake rotor alignment. Many passenger cars specify lug nut torque in the range of 80–110 lb-ft (varies by make and wheel size). Use the exact value from the owner’s manual or the label near the driver door. If you cannot find it, the safest approach is to tighten as much as you can with the provided wrench, then re-torque at the first opportunity.
Lower the car to the ground fully. Re-check lug nut tightness. Then set the flat tire aside and stow the tools securely. A small aside from roadside reality: loose tools in the trunk can become projectiles during braking.
Case Examples
Urban Shoulder With Temporary Spare
An anonymized driver in a city parking lane notices a slow leak and finds a temporary spare in the trunk. The driver checks the spare sidewall for a speed limit and reads the recommended pressure in the owner’s manual. After hazards are on, the driver positions the car on a flatter section of pavement, sets the parking brake, and shifts to Park. The driver loosens lug nuts before lifting, places the jack at the marked pinch weld point, and mounts the spare with hand-threading first. After lowering the car, the driver tightens in a star pattern and plans to re-check torque at a nearby tire shop.
Later, the tire-pressure warning remains on for a short period. The driver confirms the spare pressure with a gauge and follows the vehicle’s relearn steps from the manual. The driver avoids highway speeds until the spare’s rating is respected.
Gravel Pull-Off And Uneven Ground
An anonymized driver pulls onto a gravel shoulder where the ground is soft. The jack sinks slightly when raised, making the car feel unstable. The driver lowers the car, places a thick board under the jack base to spread the load, and lifts again at the correct jack point. The driver then removes the wheel, mounts the spare, and tightens lug nuts in a star pattern. The driver re-checks tightness after lowering fully.
In this scenario, the driver’s main lesson is stability. A jack on uneven ground increases risk, so the driver prioritizes a firm base even if it costs a few extra minutes.
Comparison Table
| Option | Best For | Key Limits | What To Check |
|---|---|---|---|
| Spare Tire (Jack + Lug Wrench) | Most flats when a spare is present | Temporary spares have speed/distance limits | Jack point, lug torque, spare pressure |
| Tire Sealant Kit | Small punctures in tread area (when provided) | Sidewall damage usually cannot be sealed | Expiration date, compressor hose fit, pressure target |
| Roadside Assistance | When tools are missing or conditions are unsafe | Time cost, but reduces risk | Location details, vehicle model, hazard setup |
Checklist for the jack-and-spare workflow:
- Hazards on; move to a stable spot; passengers out of the danger zone.
- Parking brake set; shift to Park or First gear/Reverse.
- Loosen lug nuts slightly before lifting.
- Place jack at the marked jack point; lift until the tire clears the ground.
- Remove lug nuts; mount spare; hand-thread nuts.
- Tighten in a star pattern; lower fully; re-check tightness.
- Verify spare pressure when possible; drive within the spare’s speed/distance limits.
Common Mistakes
One mistake is using the wrong jack point. Lifting at an unreinforced area can bend body panels or damage the underbody. Another mistake is forgetting to loosen lug nuts before lifting, which often leads to spinning the wheel and wasting time while the car is already raised.
People also over-tighten with the wrong torque assumptions. Over-torquing can stretch studs or distort the wheel, and under-torquing risks wheel loosening. The fix is simple: use the torque value from the owner’s manual or the label, then re-check after the first short drive if the manual recommends it.
Another frequent error is ignoring spare tire ratings. Temporary spares often have a maximum speed and a limited distance. Driving beyond those limits can overheat the tire and degrade performance. If the spare is a full-size wheel, the limits may differ, but the sidewall markings still govern.
Finally, drivers sometimes forget to stow the flat tire and tools securely. A loose jack or wrench can rattle, scratch, or shift during braking. That annoyance becomes a safety issue when the vehicle moves again.
FAQ
How Do I Find The Correct Jack Point?
Look for reinforced markings near the pinch weld or frame rail in the owner’s manual. On many cars, the jack point is visible under the rocker panel area; align the jack saddle to that marked spot.
Should I Loosen Lug Nuts Before Lifting?
Yes. Loosen them slightly while the wheel is on the ground so the wheel cannot spin. Finish removing the nuts after the tire clears the ground.
What Torque Setting Should I Use?
Use the exact lug nut torque value from your owner’s manual or the label near the driver door. Many passenger cars fall in the 80–110 lb-ft range, but the correct number varies by model and wheel size.
Can I Drive Long Distances On A Temporary Spare?
Temporary spares have speed and distance limits printed on the tire sidewall or stated in the manual. Stay within those limits and plan to repair or replace the original tire soon.
Why Does The Tire Pressure Light Stay On After The Swap?
The tire-pressure monitoring system may need time to relearn, or it may treat the spare sensor differently. Check spare pressure, then follow the vehicle’s relearn procedure from the manual if the light persists.
Author's Insight
This walkthrough emphasizes the mechanical dependencies that change outcomes: jack point placement, lug nut torque, spare pressure, and the vehicle’s tire-pressure monitoring behavior. Those factors determine whether the wheel seats correctly and whether the warning lights resolve. The steps also reflect common roadside constraints such as uneven ground and limited tools, which affect stability and safety. For exact torque values, spare pressure targets, and any relearn procedure, the owner’s manual remains the primary reference because specifications vary by make and model.
Key Takeaways
- Set up safely first: hazards, stable ground, parking brake, and passengers away from the work area.
- Loosen lug nuts before lifting, then lift at the marked jack point.
- Mount the spare with hand-threading, tighten in a star pattern, and use the manual’s torque value when possible.
- Respect the spare’s speed/distance limits and verify pressure when you can.
- Re-check tightness and address tire-pressure monitoring behavior using the vehicle’s manual guidance.