Brake Pad Minimum Thickness
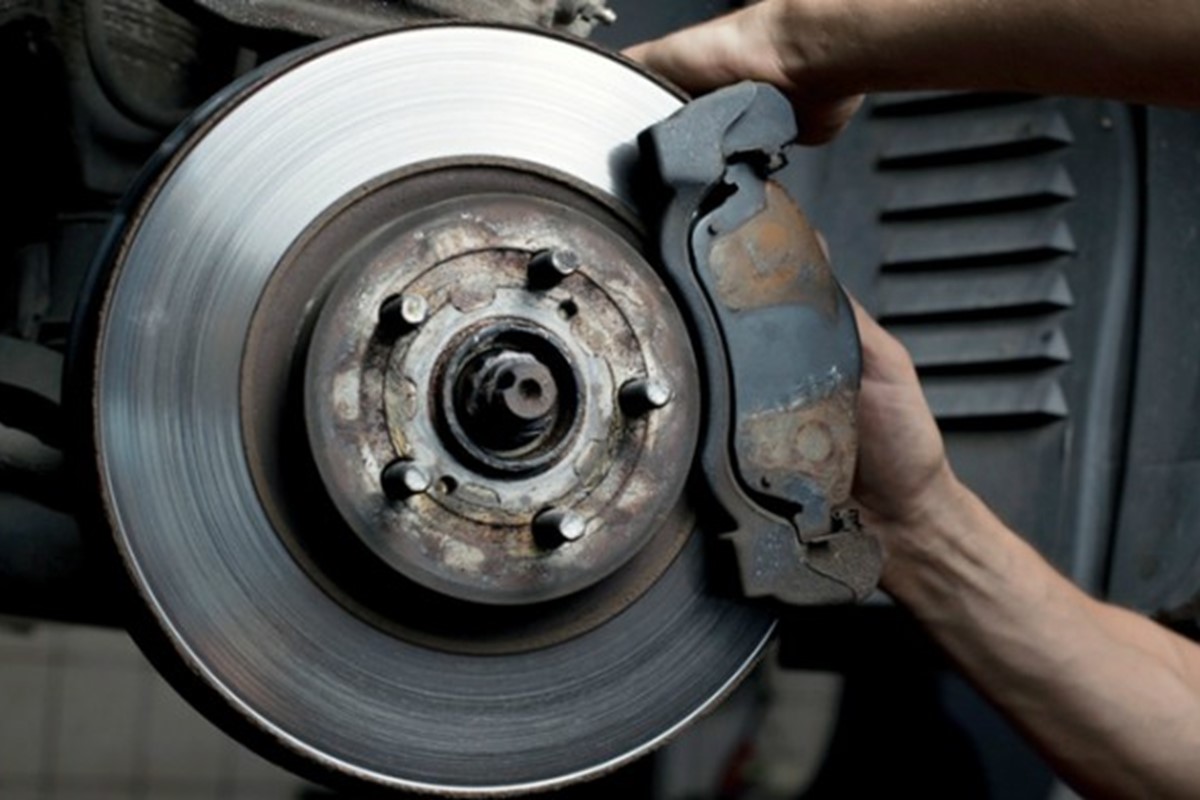
Brake pads are friction materials clamped against a rotor. As the pad wears, the friction layer gets thinner until it reaches a manufacturer-specified minimum. That minimum thickness exists because the pad’s backing plate and hardware start to change the braking behavior, and because the pad may no longer provide enough friction material to work as designed.
In many vehicles, the minimum is tied to the pad’s remaining friction material thickness, not the total pad thickness. Some pads include wear indicators that contact the rotor when the friction layer is near its limit. On other designs, the pad is thin enough that the caliper piston travel increases, which can shift pedal feel and reduce braking consistency. I’ve seen owners measure the wrong edge of the pad, then conclude the pad is “fine” when the friction layer is already close to the limit—an easy mistake when the pad is partially obscured by the caliper.
Because brake pad designs vary by brand, axle, and brake system type, the only reliable minimum is the one listed for your exact vehicle in the service information. If you do not have that data, you can still make a safe decision by using the wear indicator, checking for metal-to-rotor contact signs, and scheduling an inspection rather than relying on a generic number.
Common Wear Misreads
People often interpret “minimum thickness” as a universal number. Brake pads differ in friction formulation, backing plate thickness, and how the caliper supports the pad. A pad that reaches a certain measured thickness on one model can still have more friction material remaining on another model because the geometry and backing plate design differ.
Another frequent error is measuring the pad at the thinnest point without knowing where the friction layer ends. Some pads taper due to uneven contact, rotor runout, or caliper slide wear. If you measure only the outer edge, you can miss inner-edge wear that reaches the minimum first. Uneven wear also changes noise patterns; a pad can squeal from uneven contact even when thickness looks acceptable.
Wear rate depends on more than mileage. Brake pad life changes with driving style (hard stops vs. coasting), vehicle weight, tire grip, brake system heat cycles, and whether the vehicle uses regenerative braking heavily. A commuter who drives mostly highway at steady speeds can see slower wear than a driver who does short trips with frequent braking, even at the same odometer reading.
Supporting technologies also affect what you feel and what you measure. Anti-lock braking systems and electronic stability control do not directly “wear” pads, but they can increase brake usage during certain traction events. Brake dust composition varies by pad material, and some pads generate more dust that looks like “wear” even when the friction layer is still thick.
How To Check And Decide
Measure The Right Surface
Use the manufacturer’s measurement method when possible. Many service guides instruct measuring the friction material thickness at the thinnest visible point, avoiding the backing plate area. If the caliper blocks the view, a flashlight and mirror help, but the measurement still needs to reflect the friction layer, not the metal backing.
For a practical approach, remove the wheel and inspect both inner and outer pads. Compare thickness on each side of the axle. If one side is near the minimum while the other looks new, schedule a caliper inspection for slide binding or uneven rotor contact.
When you record measurements, note the date and mileage. I keep a simple log in a notes app (on my phone, version 17.x of the stock Notes app) because it prevents “memory math” later when you’re trying to decide whether wear accelerated after a repair.
Use Wear Indicators Correctly
Wear indicators can be a metal tab or a sensor that triggers a dash message. A metal indicator usually contacts the rotor and creates a characteristic squeal. That squeal often starts before the pad reaches the absolute minimum, so treat it as a “schedule inspection” signal rather than a “drive until it stops” signal.
Sensor-based indicators vary by design. Some systems trigger a warning when the friction layer reaches a threshold, while others trigger based on circuit continuity. If the warning appears, check the connector and wiring for damage before assuming the pads are worn out.
If you hear grinding, assume the friction material is gone or nearly gone. Grinding can damage the rotor quickly, and rotor resurfacing or replacement may become necessary.
Estimate Remaining Life Safely
Pad wear is not linear. Heat cycles, brake bedding, and caliper movement can change wear rate. Still, you can estimate remaining life by tracking thickness over time and comparing it to your prior measurements. If the pad loses, for example, a few tenths of a millimeter over a known interval, you can project a rough timeline until the minimum.
Use conservative assumptions. If you measure near the minimum, plan replacement sooner rather than later, because the next measurement interval might be longer than expected. A mild frustration point: many people wait for a “perfect” measurement day, then drive through a period of heavy braking that accelerates wear.
As a rule of thumb for decision support, if you are within a small margin of the minimum thickness listed for your vehicle, treat it as a near-term service item. The exact margin depends on your driving pattern and how quickly the pads have been wearing.
Check Rotors And Calipers
Thickness alone does not diagnose braking system health. Inspect rotor surface condition for scoring, heavy grooves, or blue heat spots. If rotors are badly worn or warped, new pads may wear unevenly again.
Caliper slide condition matters. Sticky slides can cause one pad to wear faster and can also increase pedal effort. Look for torn dust boots, uneven pad deposits, and signs of corrosion around the caliper bracket.
After replacement, bedding procedures influence performance and dust. Follow the vehicle or pad manufacturer’s bedding guidance in the service literature; skipping bedding can lead to uneven transfer layer and noise.
Educational Case Examples
Scenario A: A 2016 sedan owner checks pads through the wheel opening and sees “about 3–4 mm” remaining on the outer pad. After removing the wheel, the inner pad measures closer to 1–2 mm and the rotor shows light scoring. The owner schedules service and learns the caliper slide was sticking, causing inner-edge wear. The shop replaces pads and inspects the rotor for thickness variation before deciding on resurfacing.
Scenario B: A compact SUV driver receives a brake warning message tied to the pad sensor. The pads still look thick from the outside, and the driver assumes the warning is a sensor fault. A technician checks the harness and finds a partially disconnected connector at the caliper bracket. After reconnecting and clearing the code, the warning does not return, and the pad thickness measurements confirm the friction layer is not near the minimum.
Thickness Checklist And Table
Use this checklist to decide what to do next. It focuses on evidence you can observe, not guesses.
| Check | What You Look For | What It Suggests | Next Step |
|---|---|---|---|
| Friction Layer Thickness | Measure the thinnest visible friction material point on inner and outer pads | Approaching or below the vehicle’s minimum limit | Replace pads and inspect rotor condition |
| Wear Indicator | Squeal pattern or dash warning tied to pad sensor | Friction layer near threshold or sensor circuit issue | Inspect pads and wiring before assuming wear |
| Rotor Surface | Grooves, deep scoring, heavy blue heat marks, or uneven wear | Rotor damage that can shorten pad life | Measure rotor thickness and decide on resurfacing or replacement |
| Uneven Pad Wear | Inner vs outer thickness mismatch on the same axle | Caliper slide or alignment issue | Inspect caliper hardware and replace worn components as needed |
Step-by-step checklist for the next inspection:
- Check for noise patterns during light braking and note when they occur.
- Inspect both inner and outer pads after removing the wheel if the view is limited.
- Measure friction material thickness at the thinnest point on each pad.
- Compare left vs right on the same axle to spot uneven wear.
- Inspect rotor surface for scoring and heat discoloration.
- Decide based on the vehicle’s stated minimum thickness and rotor condition, then schedule service if you are near the limit.
Common Mistakes To Avoid
One mistake is using a generic “minimum pad thickness” number from the internet. Vehicle service limits depend on pad design and caliper geometry, so a universal number can mislead you into driving with insufficient friction material.
Another mistake is ignoring uneven wear. If one pad is much thinner, the system has a mechanical issue. Replacing only the thin pad can leave the underlying caliper problem unresolved, and the new pad can wear quickly.
People also confuse brake dust with pad wear. Dust can accumulate on wheels and calipers even when friction material remains. A cleaner rotor surface does not guarantee the pads are thick, and a dusty rotor does not guarantee the pads are worn.
Finally, some owners delay inspection after a wear indicator triggers. A sensor warning can reflect wiring faults, but a metal indicator squeal often means the friction layer is already close to the minimum. Waiting for “later” can turn a pad replacement into a rotor replacement.
FAQ
What Is The Minimum Pad Thickness?
The minimum thickness is the lowest remaining friction material thickness specified for your exact vehicle and brake pad design. It is listed in the vehicle’s service information and differs across models and brake systems.
Can I Measure Brake Pads Without Removing The Wheel?
Sometimes you can see enough to estimate thickness, but the view often hides the inner pad and the thinnest point. A wheel removal inspection gives more reliable measurements for decision-making.
How Do Wear Indicators Work?
Some indicators are mechanical tabs that contact the rotor and create noise near the threshold. Others are electrical sensors that trigger a dash warning based on circuit continuity.
What Happens If Pads Go Below The Limit?
Braking performance can degrade because the friction layer may be too thin to behave as designed. Metal-to-rotor contact can also damage the rotor and increase repair cost.
Do Brake Pads Wear Faster With Regenerative Braking?
Regenerative braking usually reduces friction brake use, which can slow pad wear. Wear still depends on driving pattern, how often friction brakes are used for low-speed stops, and how the vehicle blends braking.
Author's Insight
Brake pad minimum thickness is a design limit tied to friction material behavior, caliper travel, and rotor protection. Service manuals treat it as a vehicle-specific threshold rather than a universal number, which matches how pad geometry and backing plate construction vary. A careful inspection focuses on the friction layer thickness at the thinnest point, checks inner vs outer wear, and evaluates rotor condition because thickness alone does not reveal caliper problems.
When you lack the exact minimum spec, the safest approach is to use wear indicators as a prompt for inspection and to avoid driving until grinding starts. If you want to track wear over time, record measurements with date and mileage so you can judge whether wear is accelerating after a repair.
Key Takeaways
- Minimum thickness refers to the friction material limit for your specific vehicle, not a universal number.
- Measure inner and outer pads and compare sides to catch uneven wear from caliper or rotor issues.
- Use wear indicators as signals to inspect, not as permission to delay service.
- Check rotor condition because worn rotors can shorten pad life even after replacement.
- If you are near the minimum or hear grinding, schedule service promptly to avoid rotor damage.